


 25 Questions for a Construction Customer Satisfaction Survey
How to Collect Leads with a Form on Your Website
Updated
On this page
At the end of this guide, your website has a short request form in a pop-up window or a button. Each lead arrives with its traffic source, you get it by email right away, and a copy goes to Google Sheets or your CRM. The setup takes 8 steps and about 30 minutes. The example is a catering request form for the Brew & Bean coffee shop.
Before you start
The steps use features from different plans:
| What | Plan |
|---|---|
| The form with Radio Button and Phone Number questions, adding it to the website, an email about each lead | All plans, including Free |
| Full name and Email questions, Thank You Screen, Google Analytics, Meta Pixel, Zapier | Basic and higher |
| Consent to data processing, hidden variables for the traffic source, Google Sheets, webhooks | Standard and higher |
New accounts get a 14-day trial of the Premium plan, so you can set up and test the whole path. See What Happens After the Trial Ends? and compare plans.
You also need access to your website's HTML or to a website builder that lets you add code to a page.
Step 1. Build a short form
- On the dashboard, click Create new survey, then Start from scratch. Name the survey, for example "Brew & Bean catering request".
- Add a Question Group, so that the contact fields share one screen. Inside it, add Full name, Email and Phone Number.
- In the Full name settings, turn off Add “Patronymic” field. In the Phone Number settings, choose your Default country.
- Turn on Required response for the email and phone questions, or turn on Required answers in group for the whole group.
- Add a Radio Button question about the request, for example "What do you need catering for?" with the options Office breakfast, Corporate event, Private party and Other.
- Add a Thank You Screen that says what happens next, for example "Thank you. We'll call you within one business day."
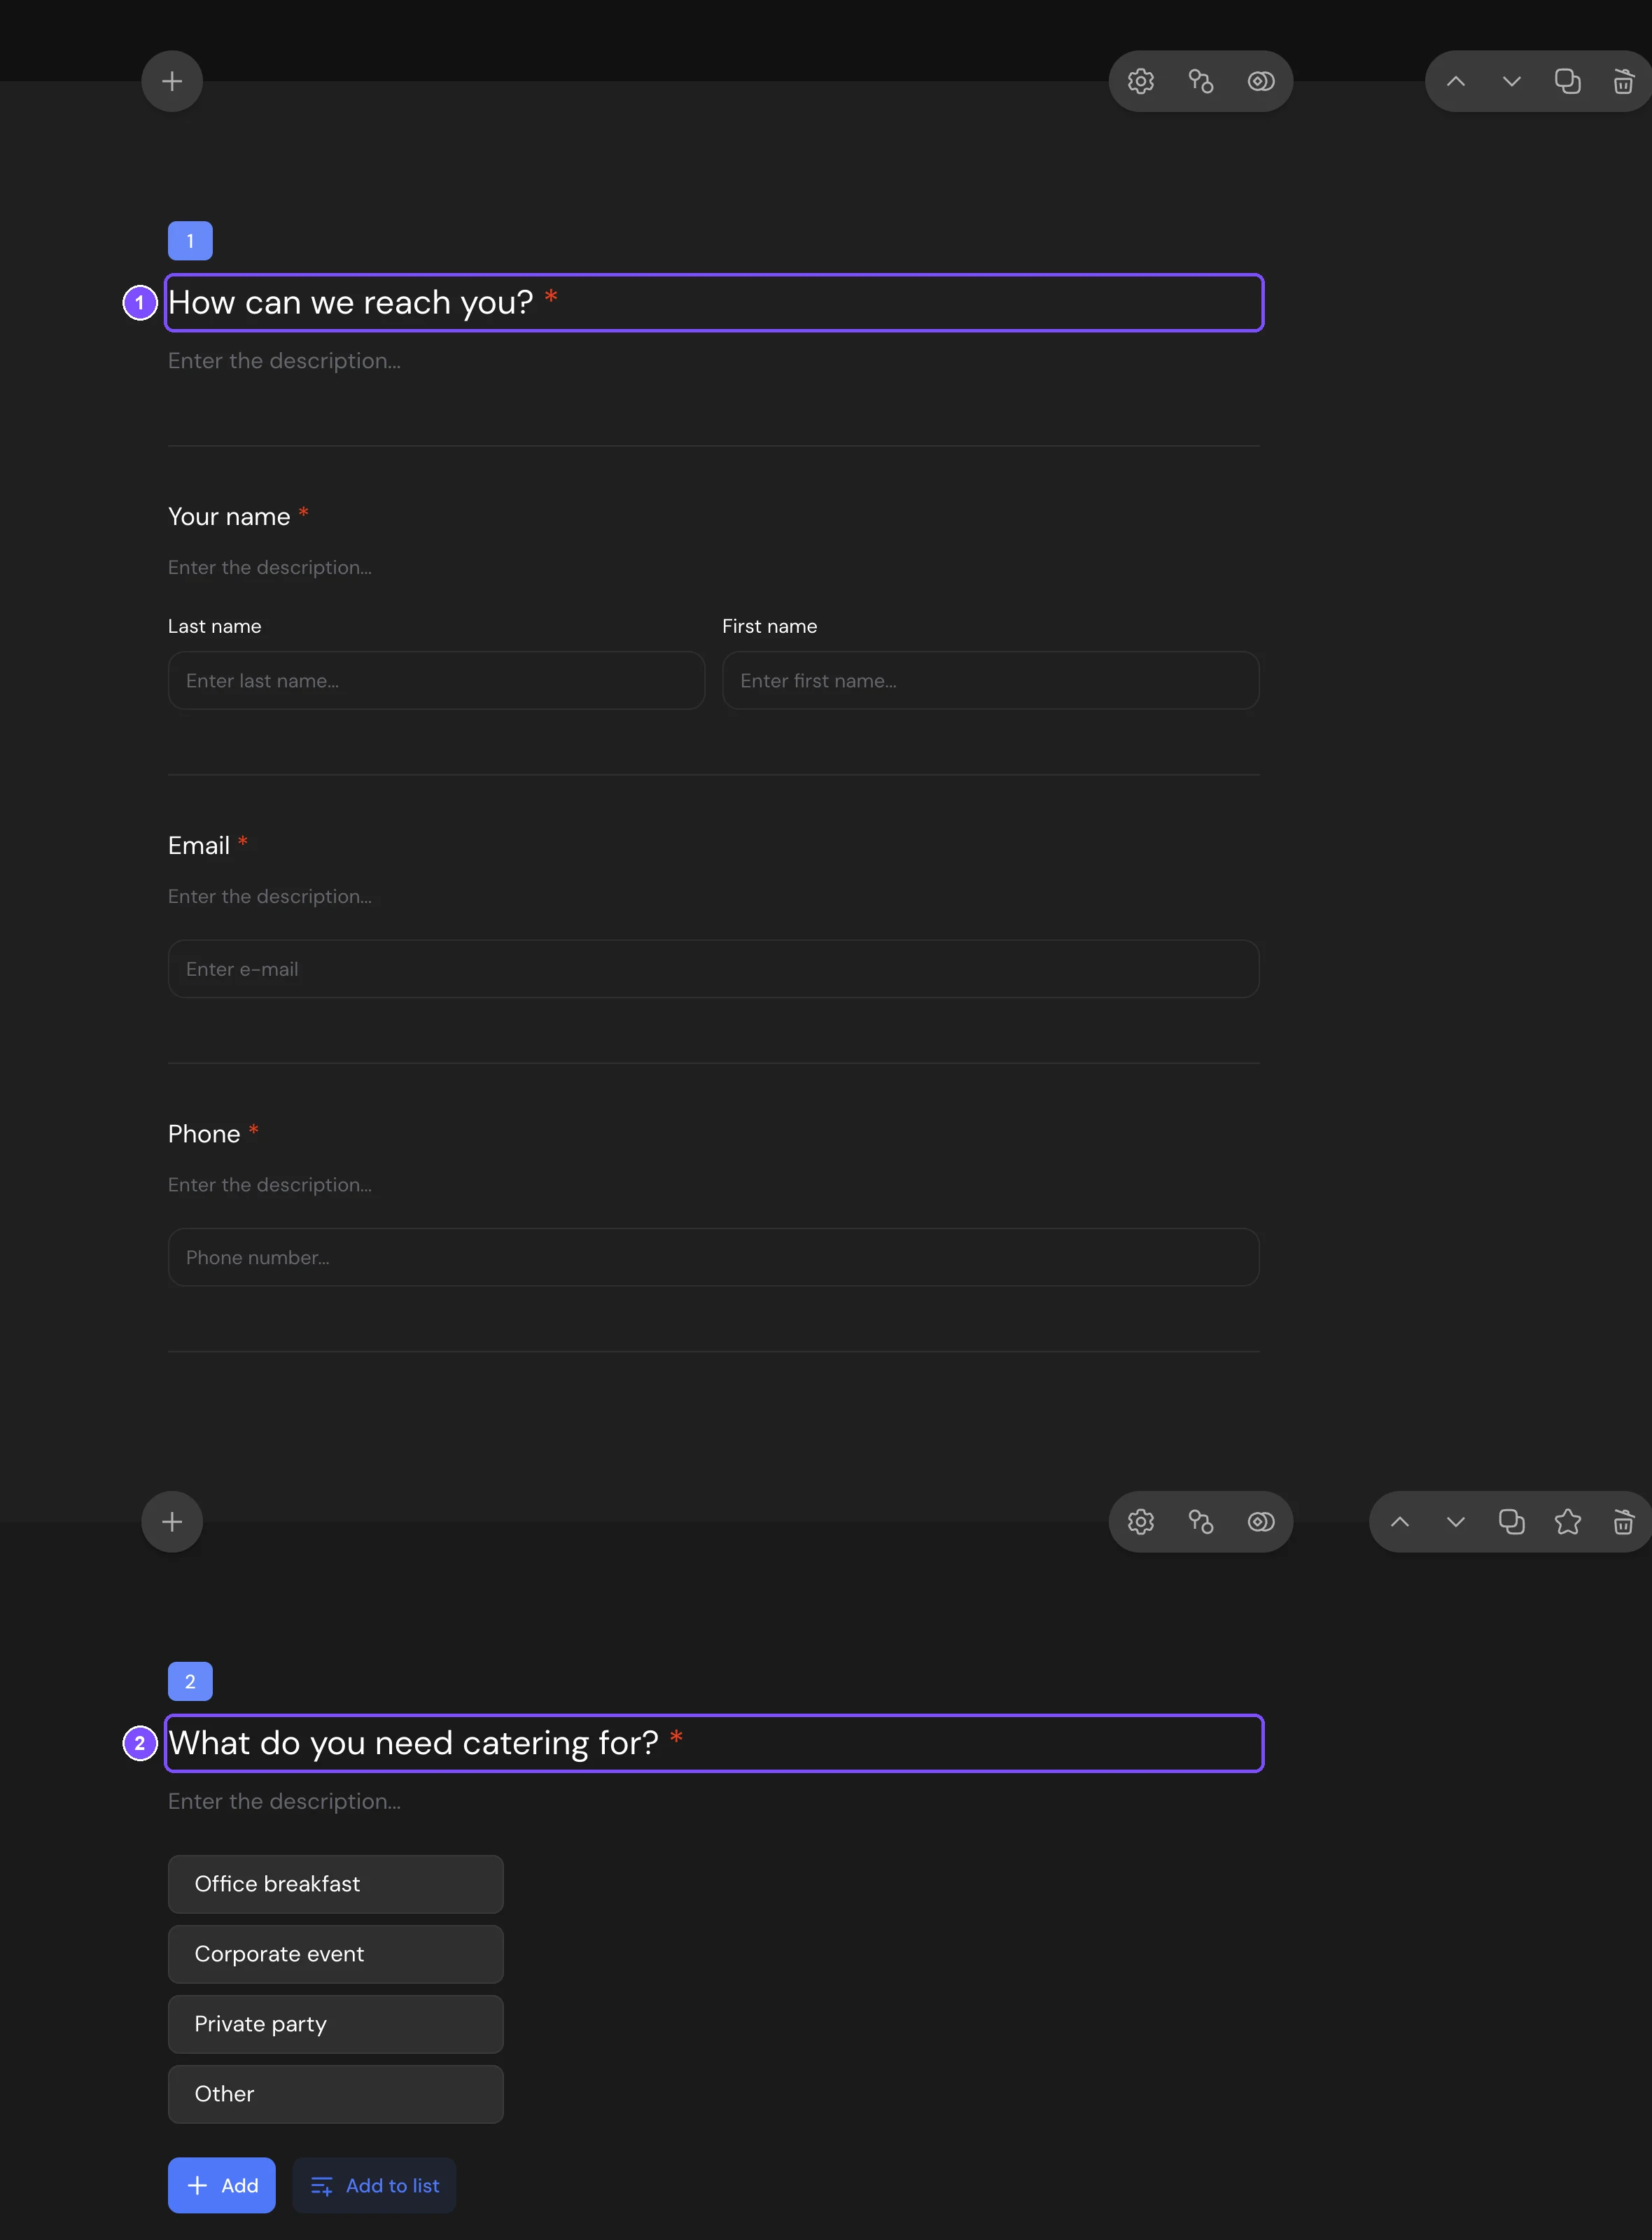
Ask only what you need for the first call. Details: Name, Email, Phone and Date Fields, Choice Questions, Question Group, Thank You Screen.
Step 2. Ask for consent to data processing
- In Builder, click the Send card after the last question, then the gear icon (Settings). The panel is called Submit button.
- Turn on Consent to personal data processing.
- Click Edit document to write your policy text, or turn on Custom link to document and paste the link to the privacy policy on your website.
Respondents now see the "I agree to personal data processing" checkbox under the submit button and can't send the form until they tick it.
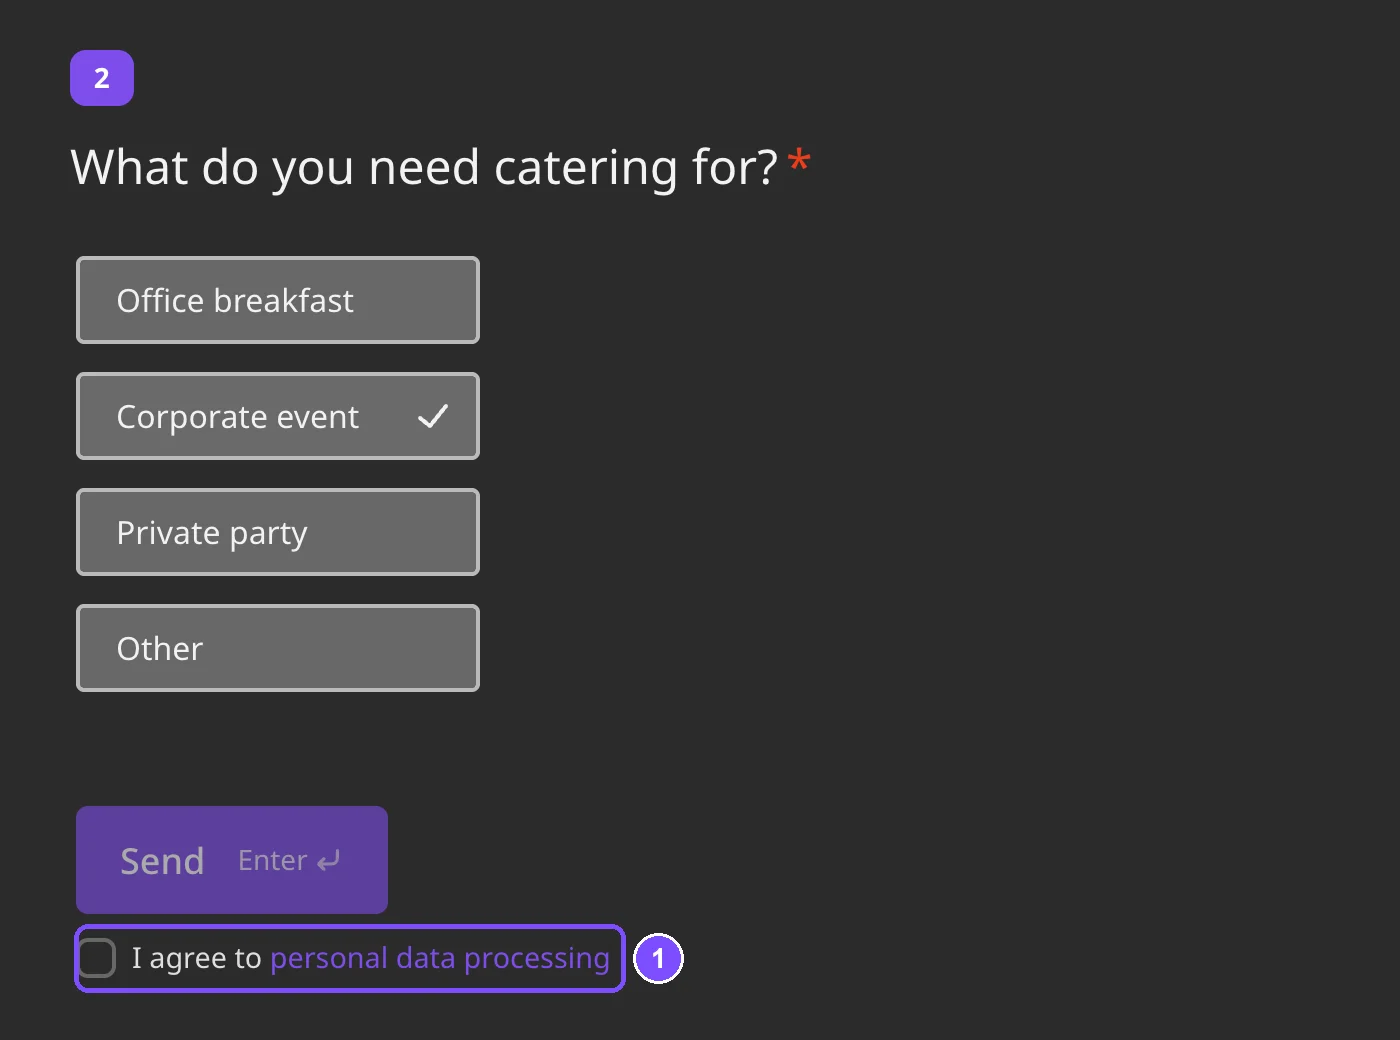
Details: Submit button.
Step 3. Publish the form and add the traffic source
- Click Publish in the top right corner. The Share tab becomes available.
- Go to Share → URL parameters.
- Under Variables in the link, click utm_source and utm_campaign.
Visitors don't see these hidden variables. Their values are saved with each lead and show which page or campaign the request came from.
Step 4. Put the form on your website
- Go to Share → On website.
- Choose how the form appears: Widget, Pop-up window, Iframe or Button. A pop-up window opens over the page, a button opens the form on click, a widget keeps a tab at the side of the page, and an iframe puts the form inside the page content.
- Set up the options. Brew & Bean uses Pop-up window: in When to open it (1) it chooses With a delay, in Delay BEFORE opening (2) enters 2 seconds and turns on Don't show after submission (3), so people who already sent a request don't see the window again. The preview on the left shows how the window looks over a page.
- In Website installation, click Show code. Find utm_source=xxxx and replace xxxx with a value for this page, for example catering_page. Do the same for utm_campaign.
- Click Copy code and paste it into your website: before the closing body tag for a pop-up window or a widget, in the page HTML where the button should be for a button.
- Save the changes on your website. The form appears for visitors right away.
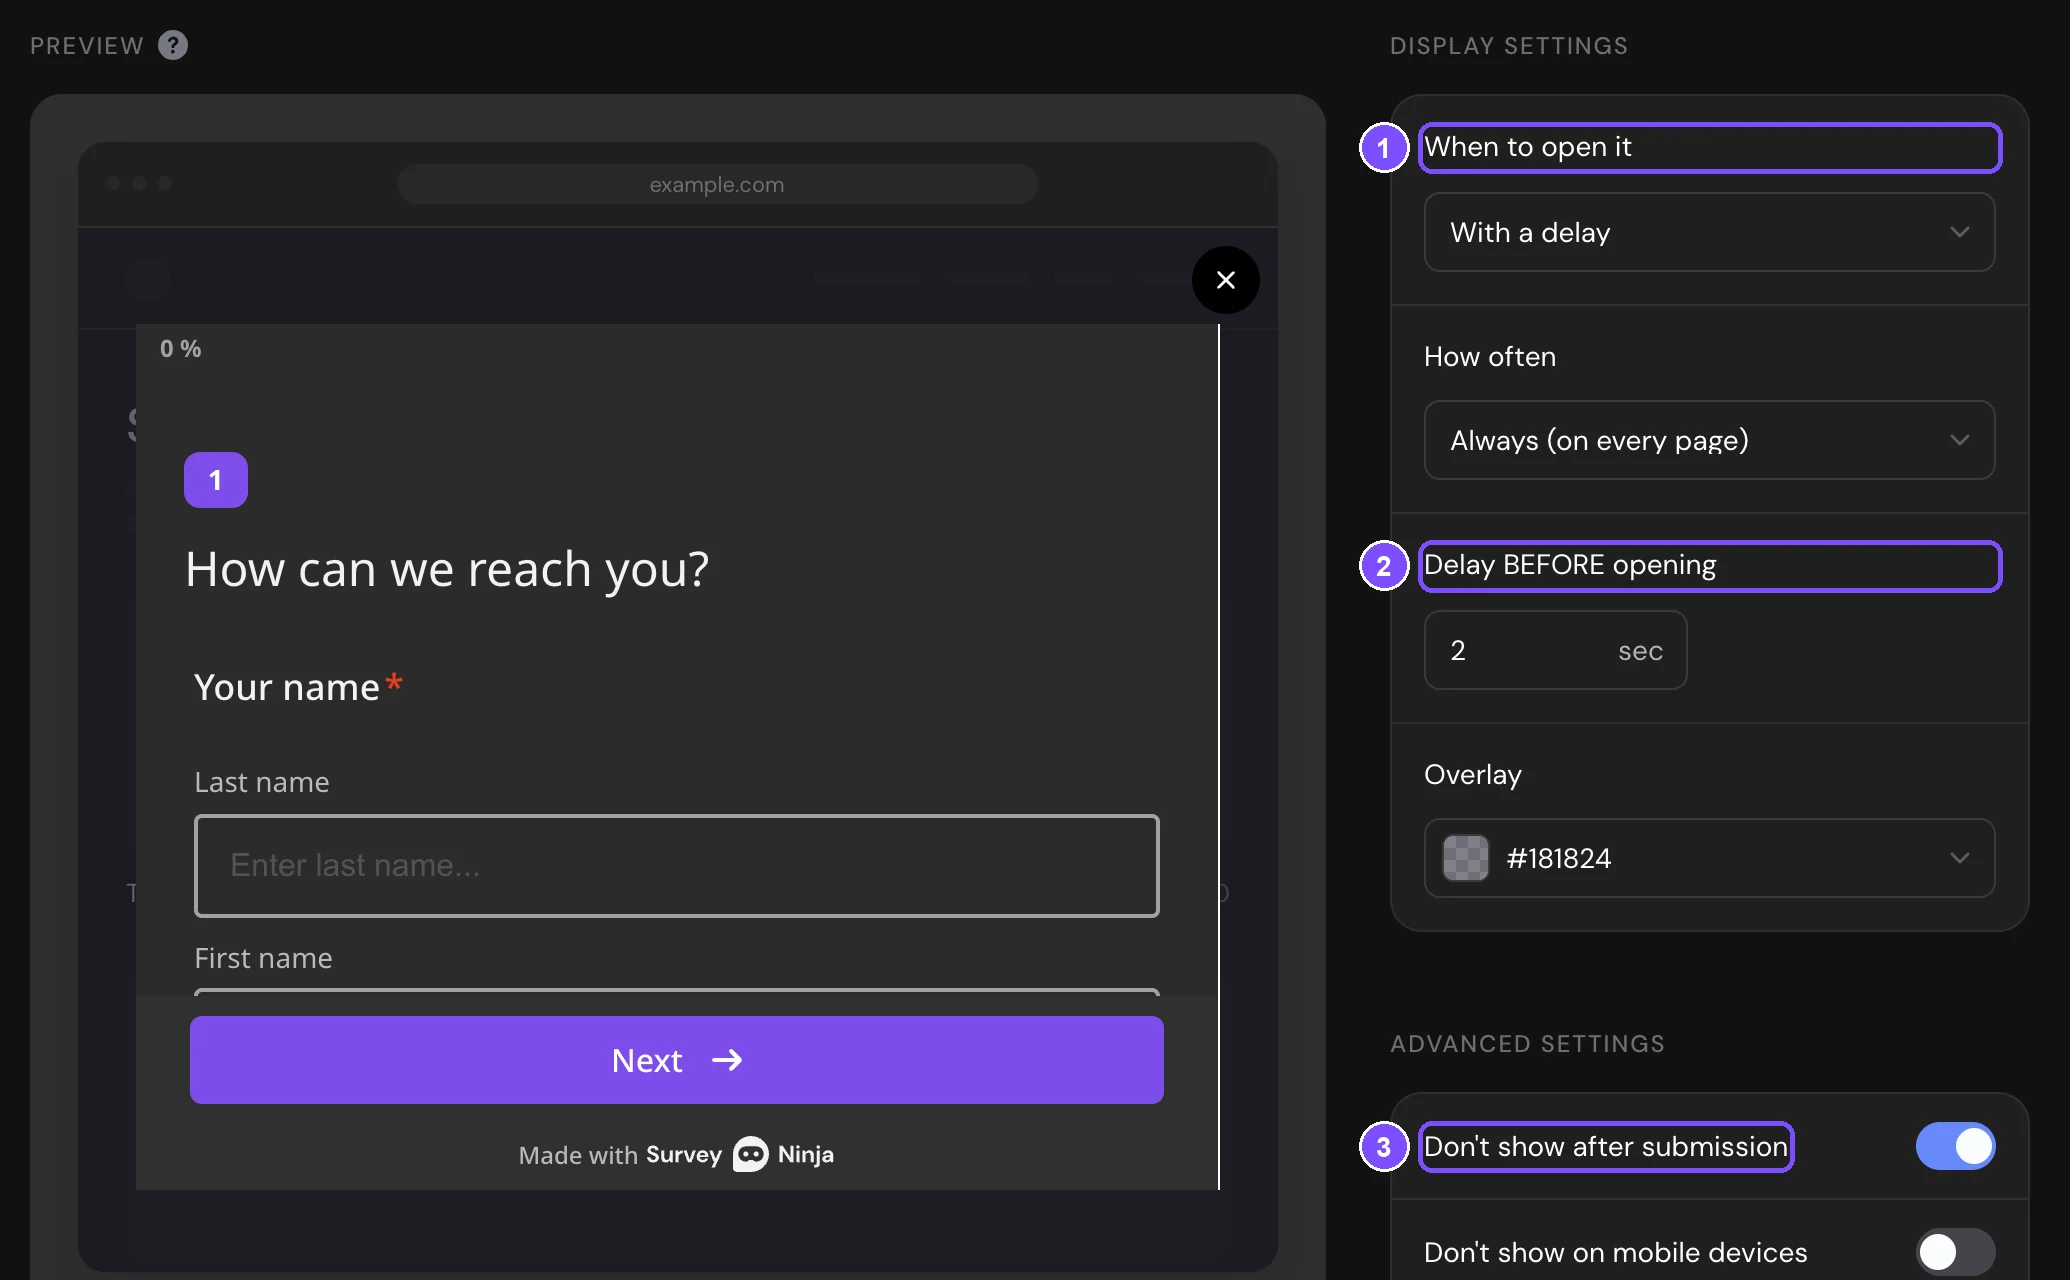
The settings on this page aren't saved, so copy the code once you finish. More about each method: Publishing a Survey and Adding It to a Website.
Note. The code doesn't read UTM tags from the address of your page. To save each visitor's own tags, your developer can put them into the code instead of xxxx. The Iframe code has no variables at all: add them to the survey address in it, as in a link.
Tip. If an ad leads straight to the form, use the survey link from Share → URL parameters with its own values for each campaign.
A micro survey also shows a short card on your website, but its code doesn't pass hidden variables.
Step 5. Get an email about each lead
- Go to the Notifications tab.
- Under Notifications to survey owner, turn on Email about survey completion.
- In Add new email, enter the address of the person who handles requests and click Send code. Enter the 4-digit code from the email.
- In Reply to respondent (Reply-To), choose the Email question. When you click Reply in your mail app, the reply goes to the lead.
- In Hidden Variables, check that utm_source and utm_campaign are selected, so the source is in the email too.
Emails about new responses can go to 1 address on the Free plan, 3 on Basic, 5 on Standard and 10 on Premium. Details: Email Notifications.
Step 6. Send leads to Google Sheets or your CRM
- Google Sheets. On the Integrations tab, click Google Sheets, then Connect, and sign in with Google. Open Create a new spreadsheet and click Create a spreadsheet. Each new lead becomes a row, with a column for each question and each hidden variable. See Google Sheets.
- CRM through a webhook. On the Integrations tab, click Webhook, then Create a Webhook. Paste the address from your CRM into Call Back URL, set Request Type to POST and click Save. A new webhook is saved turned off, so turn on the switch next to it. Hidden variables arrive in the extra_params field. See Webhooks.
If your CRM doesn't accept webhooks, connect it through Zapier (Basic and higher).
Step 7. Track conversions in Google Analytics and Meta Pixel
- Google Analytics. On the Integrations tab, click Google Analytics and paste your Measurement ID into Tracking ID. The list below the field shows the Goal ID of each survey event. In Google Analytics 4, mark the event of Respondent submitted a response as a key event to count leads. See Google Analytics.
- Meta Pixel. On the Integrations tab, click Meta Pixel and paste the ID into Pixel ID. Survey actions, including sending the form, arrive in Events Manager as CustomEvent. See Meta Pixel.
Click Publish after you add the IDs: the counters are added to the published survey only. Events come from the form, not from your page, so in the reports they have the survey address. The answers themselves aren't sent.
Step 8. Send a test lead
- Open your website page in a private browser window, wait for the form and send it with test data.
- Check that the email arrived and the lead appeared in Results with the Hidden values block.
- Check the new row in Google Sheets, or open Logs of the webhook and look at the last request.
- Check the event in Google Analytics or Meta Events Manager. Events aren't sent from the survey preview, so test on your website.
- Delete the test response, so that it doesn't count as a lead. See Deleting Responses.
What's next
- Ask corporate clients one more question about the number of guests with Logic Jumps.
- Send each lead a thank-you email with their answers. See Email Notifications.
- Filter leads by source with the Hidden Variables filter and download them. See Viewing and Downloading Survey Responses.