


 25 Questions for a Construction Customer Satisfaction Survey
How to Create a Quiz with Scores
Updated
On this page
At the end, you'll have a published quiz that counts points, shows each respondent their score and a result for their score range, and keeps every score in your results. It takes 8 steps and about 20 minutes. The example is a final quiz for an online barista course: 5 questions, 7 points in total.
Before you start
Correct answers and points work on every plan, including Free. Some steps need a paid plan:
| Step | Plan |
|---|---|
| Correct answers and points | All plans |
| Full name and Email questions | Basic and higher |
| Thank You Screen with the score and a result by score | Basic and higher |
| Filtering and downloading responses | Basic and higher |
| Survey timer and Question timer | Standard and higher |
On the Free plan, respondents don't see their score, but you see the Total score of each response in Results. Compare plans
Step 1. Create the survey
- On the dashboard, click Create new survey.
- Choose Start from scratch, enter a name such as "Barista Basics: Final Quiz" and click Create survey. The builder opens.
To get a draft with points and correct answers from a description, choose With the help of AI and turn on Create a test (with scores), then check it from Step 4. See Creating a Survey with AI.
Step 2. Ask for the name and email
Put the contact questions first. With a time limit (Step 6), the name and email are then saved even when a respondent runs out of time.
- Click + and choose Full name in the Contact details section. To keep only the first and last name, click the gear icon (Settings) and turn off Add “Patronymic” field.
- Add an Email question below it.
The name and email arrive with each response, so you know whose score it is. See Name, Email, Phone and Date Fields.
Step 3. Add the quiz questions
Click +, choose a type in the Choice section and type the question and the options. Text questions can't get points. See Single and Multiple Choice Questions.
The barista quiz:
| Question | Type | Options | Correct |
|---|---|---|---|
| What water temperature is best for brewing espresso? | Radio Button | 70–75 °C, 90–96 °C, 100 °C | 90–96 °C |
| How long should a single espresso shot take? | Radio Button | 10–15 seconds, 25–30 seconds, 45–60 seconds | 25–30 seconds |
| Which drinks are made with espresso? | Multiple Choice | Latte, Flat white, Cold brew, Americano | Latte, Flat white, Americano |
| Should you purge the steam wand after steaming milk? | Yes or No | Yes, No | Yes |

| Which grind size suits a French press? | Dropdown | Coarse, Medium, Fine | Coarse |
Tip. On the Settings tab, in Filling behavior, set Required Responses to All required so nobody skips a question. Turn on Prevent returning to the previous question if respondents shouldn't go back and change answers.
Step 4. Mark correct answers and give points
- Select the first quiz question and click the Scores icon on the question panel, next to the logic icon. The Answer Scores window opens.
- Switch to All questions at the top to see the whole quiz in one list.
- At the bottom of the window, turn on Correct and Incorrect Answers and Scores.
- Click the marker next to each right option to mark it as correct. When the mode is turned on, every option starts as incorrect.
- Enter the points next to the right options. In the example, each right option gets 1 point, so the maximum is 7.

Changes are saved right away. In Multiple Choice, the points of every chosen option add up, so you can give wrong options negative points, for example −1 for Cold brew. See Scores, Correct Answers and Personality Tests.
Step 5. Show the score and the result at the end
- Click + below the last question and choose Thank You Screen in the Basic section.
- Click the gear icon (Settings) on the Thank You Screen and turn on Scoring points (1). The screen gets the line "You scored … points". Click the words before and after the number and type them in, even if you keep them as they are: until you edit them, respondents see only the number.
- Turn on Action button and choose Show answers (2). The button opens a page with the respondent's answers, where right options are marked "Correct answer" and wrong choices "Incorrect answer".
- Click the logic icon on the Thank You Screen and click Add text conditionally.
- Under Scores, choose From and To and enter 0 and 4. Fill in Display title and Display description, for example "Keep practicing" and "Review the espresso module before your first shift".
- Click + under the condition and add 5 to 7: "Ready for the bar" and "You know your espresso basics". Click Save.
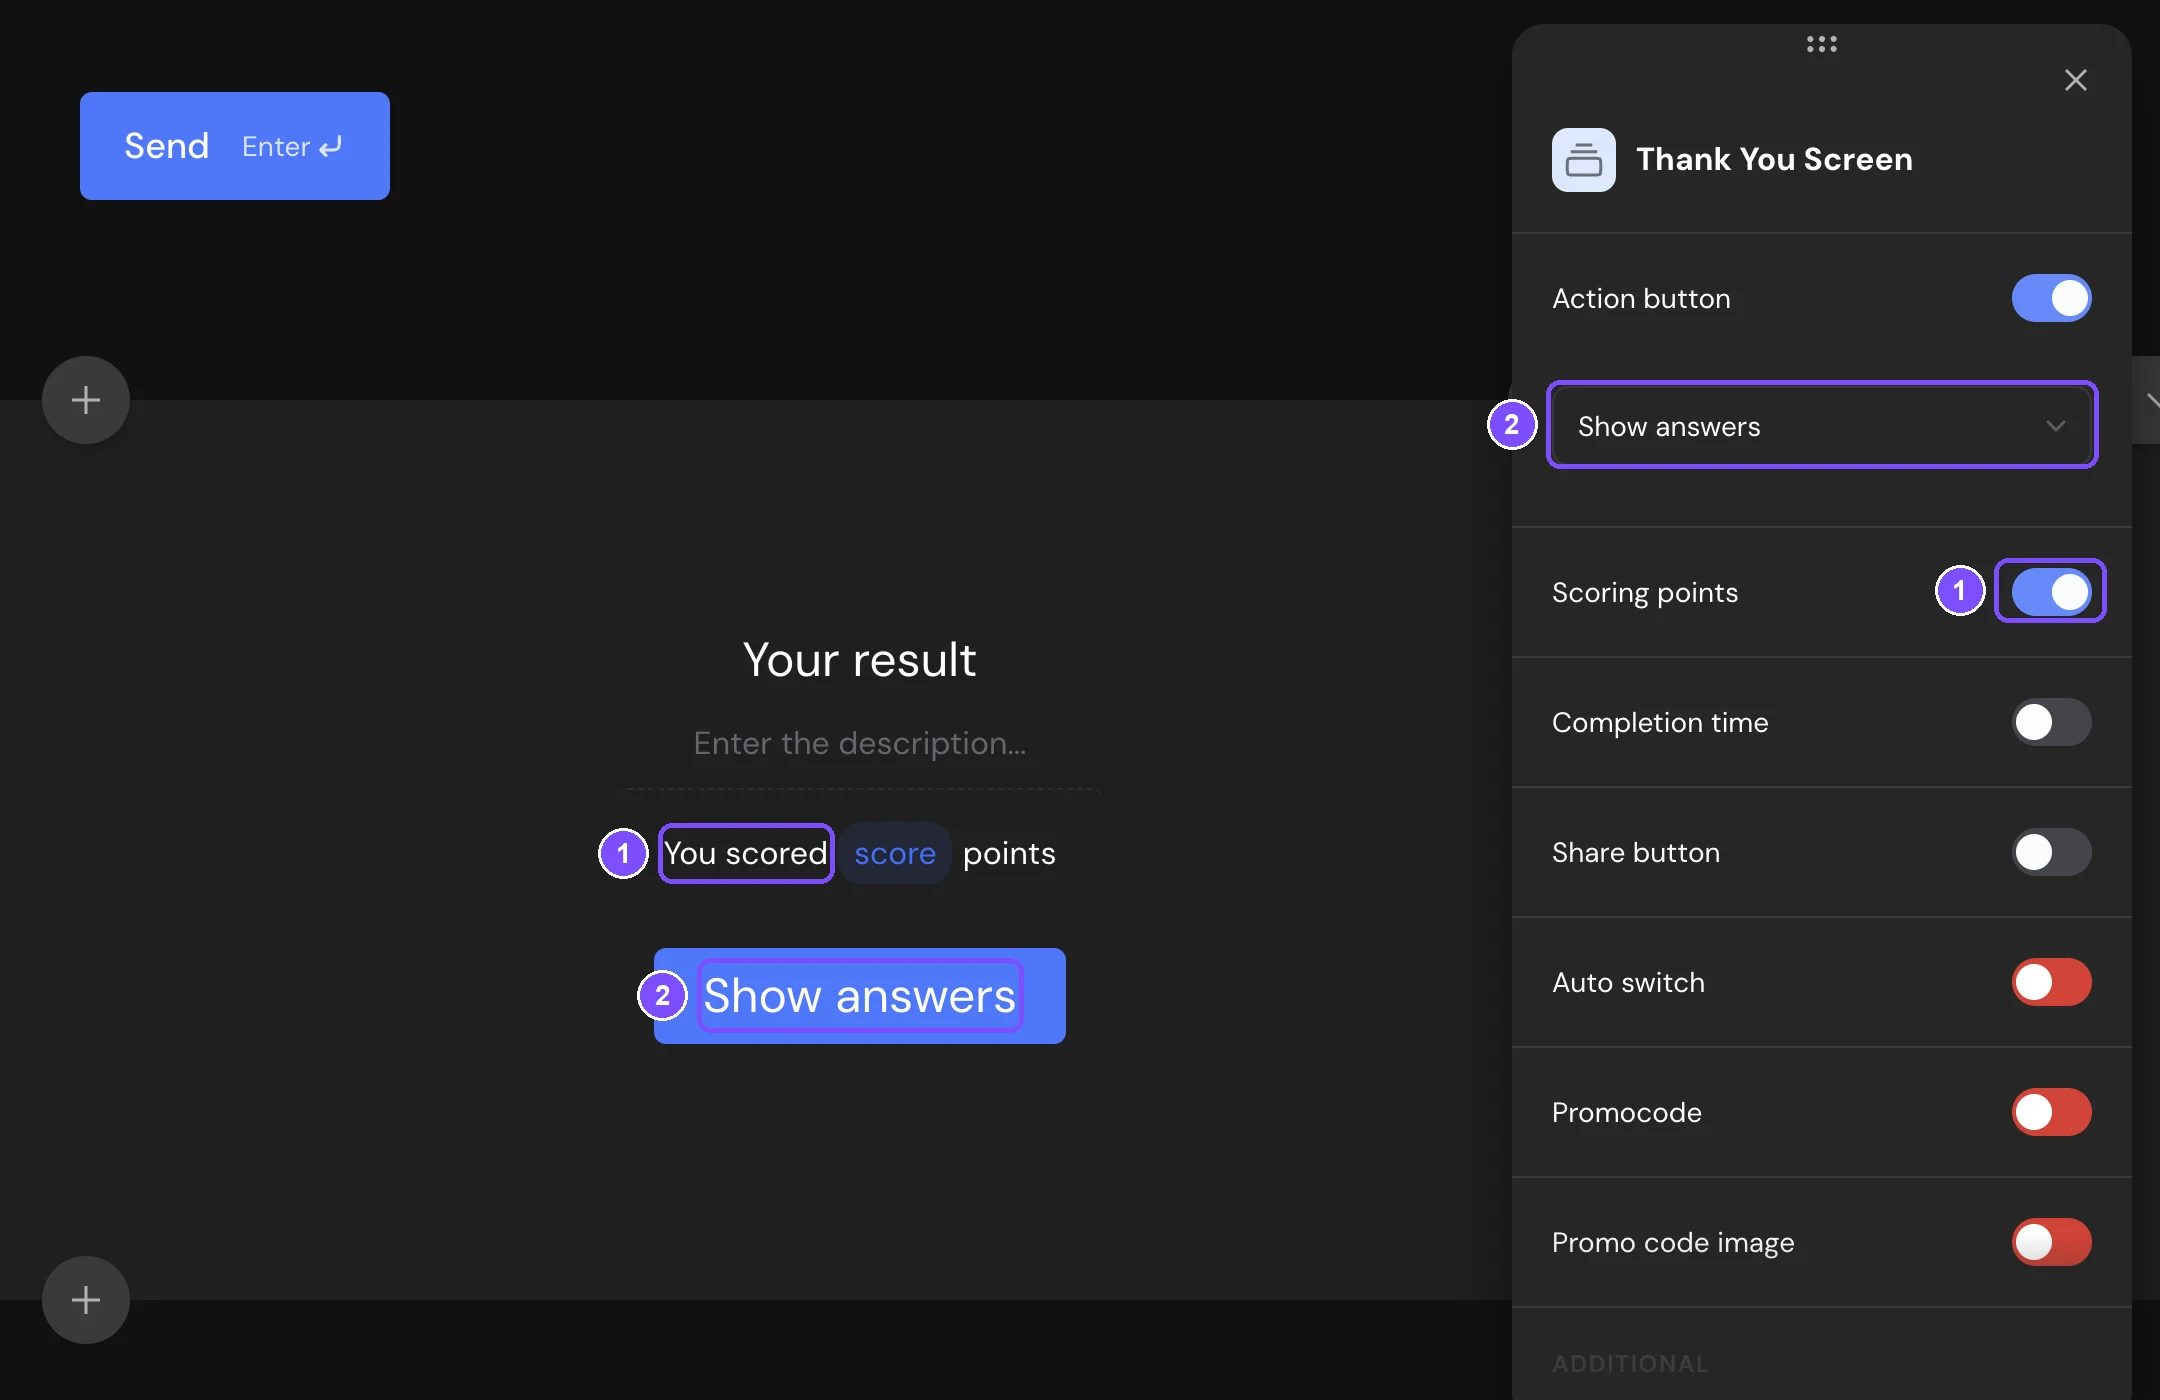
Respondents whose score fits no condition see the standard text of the screen. All screen settings: Welcome, Thank You and Other Survey Screens.
Note. For a result with its own button, such as a link to the next course, add a second Thank You Screen. On the last question, add a logic jump on the By total score tab, set the score and choose Finish survey early with that screen. See Logic Jumps.
Step 6. Set a time limit
This step is optional.
- Open the Settings tab of the survey.
- In Identification and access, turn on Survey timer and enter the time, for example 5 minutes.
Respondents see a countdown. When the time runs out, the quiz ends and the answers given so far are saved. For a limit on each question, use Question timer in Filling behavior instead. See Timers and Scheduled Access.
Step 7. Check and publish the quiz
- Click Preview and take the quiz twice, with right and with wrong answers, to check the score and the result text. Preview responses aren't saved. See Previewing Your Survey.
- Click Publish. The Share the Survey panel opens with the link.
- Click Copy and send the link to your students, or add the quiz to the course page from Share → On website. See Publishing a Survey and Adding It to a Website.
By default, each person can send the quiz once. To change this, see Survey Access and Protection.
Step 8. See the scores in the results
- Click Results → Responses. Each response shows the name and email, the answers marked as correct or incorrect, and the Total score.
- To see only those who passed, click Filter, set Score to More than 4 and click Apply.
- To download the scores, click the Download icon and choose CSV or XLSX. The file has a Total score column, and each answer is followed by "(Correct)" or "(Incorrect)".
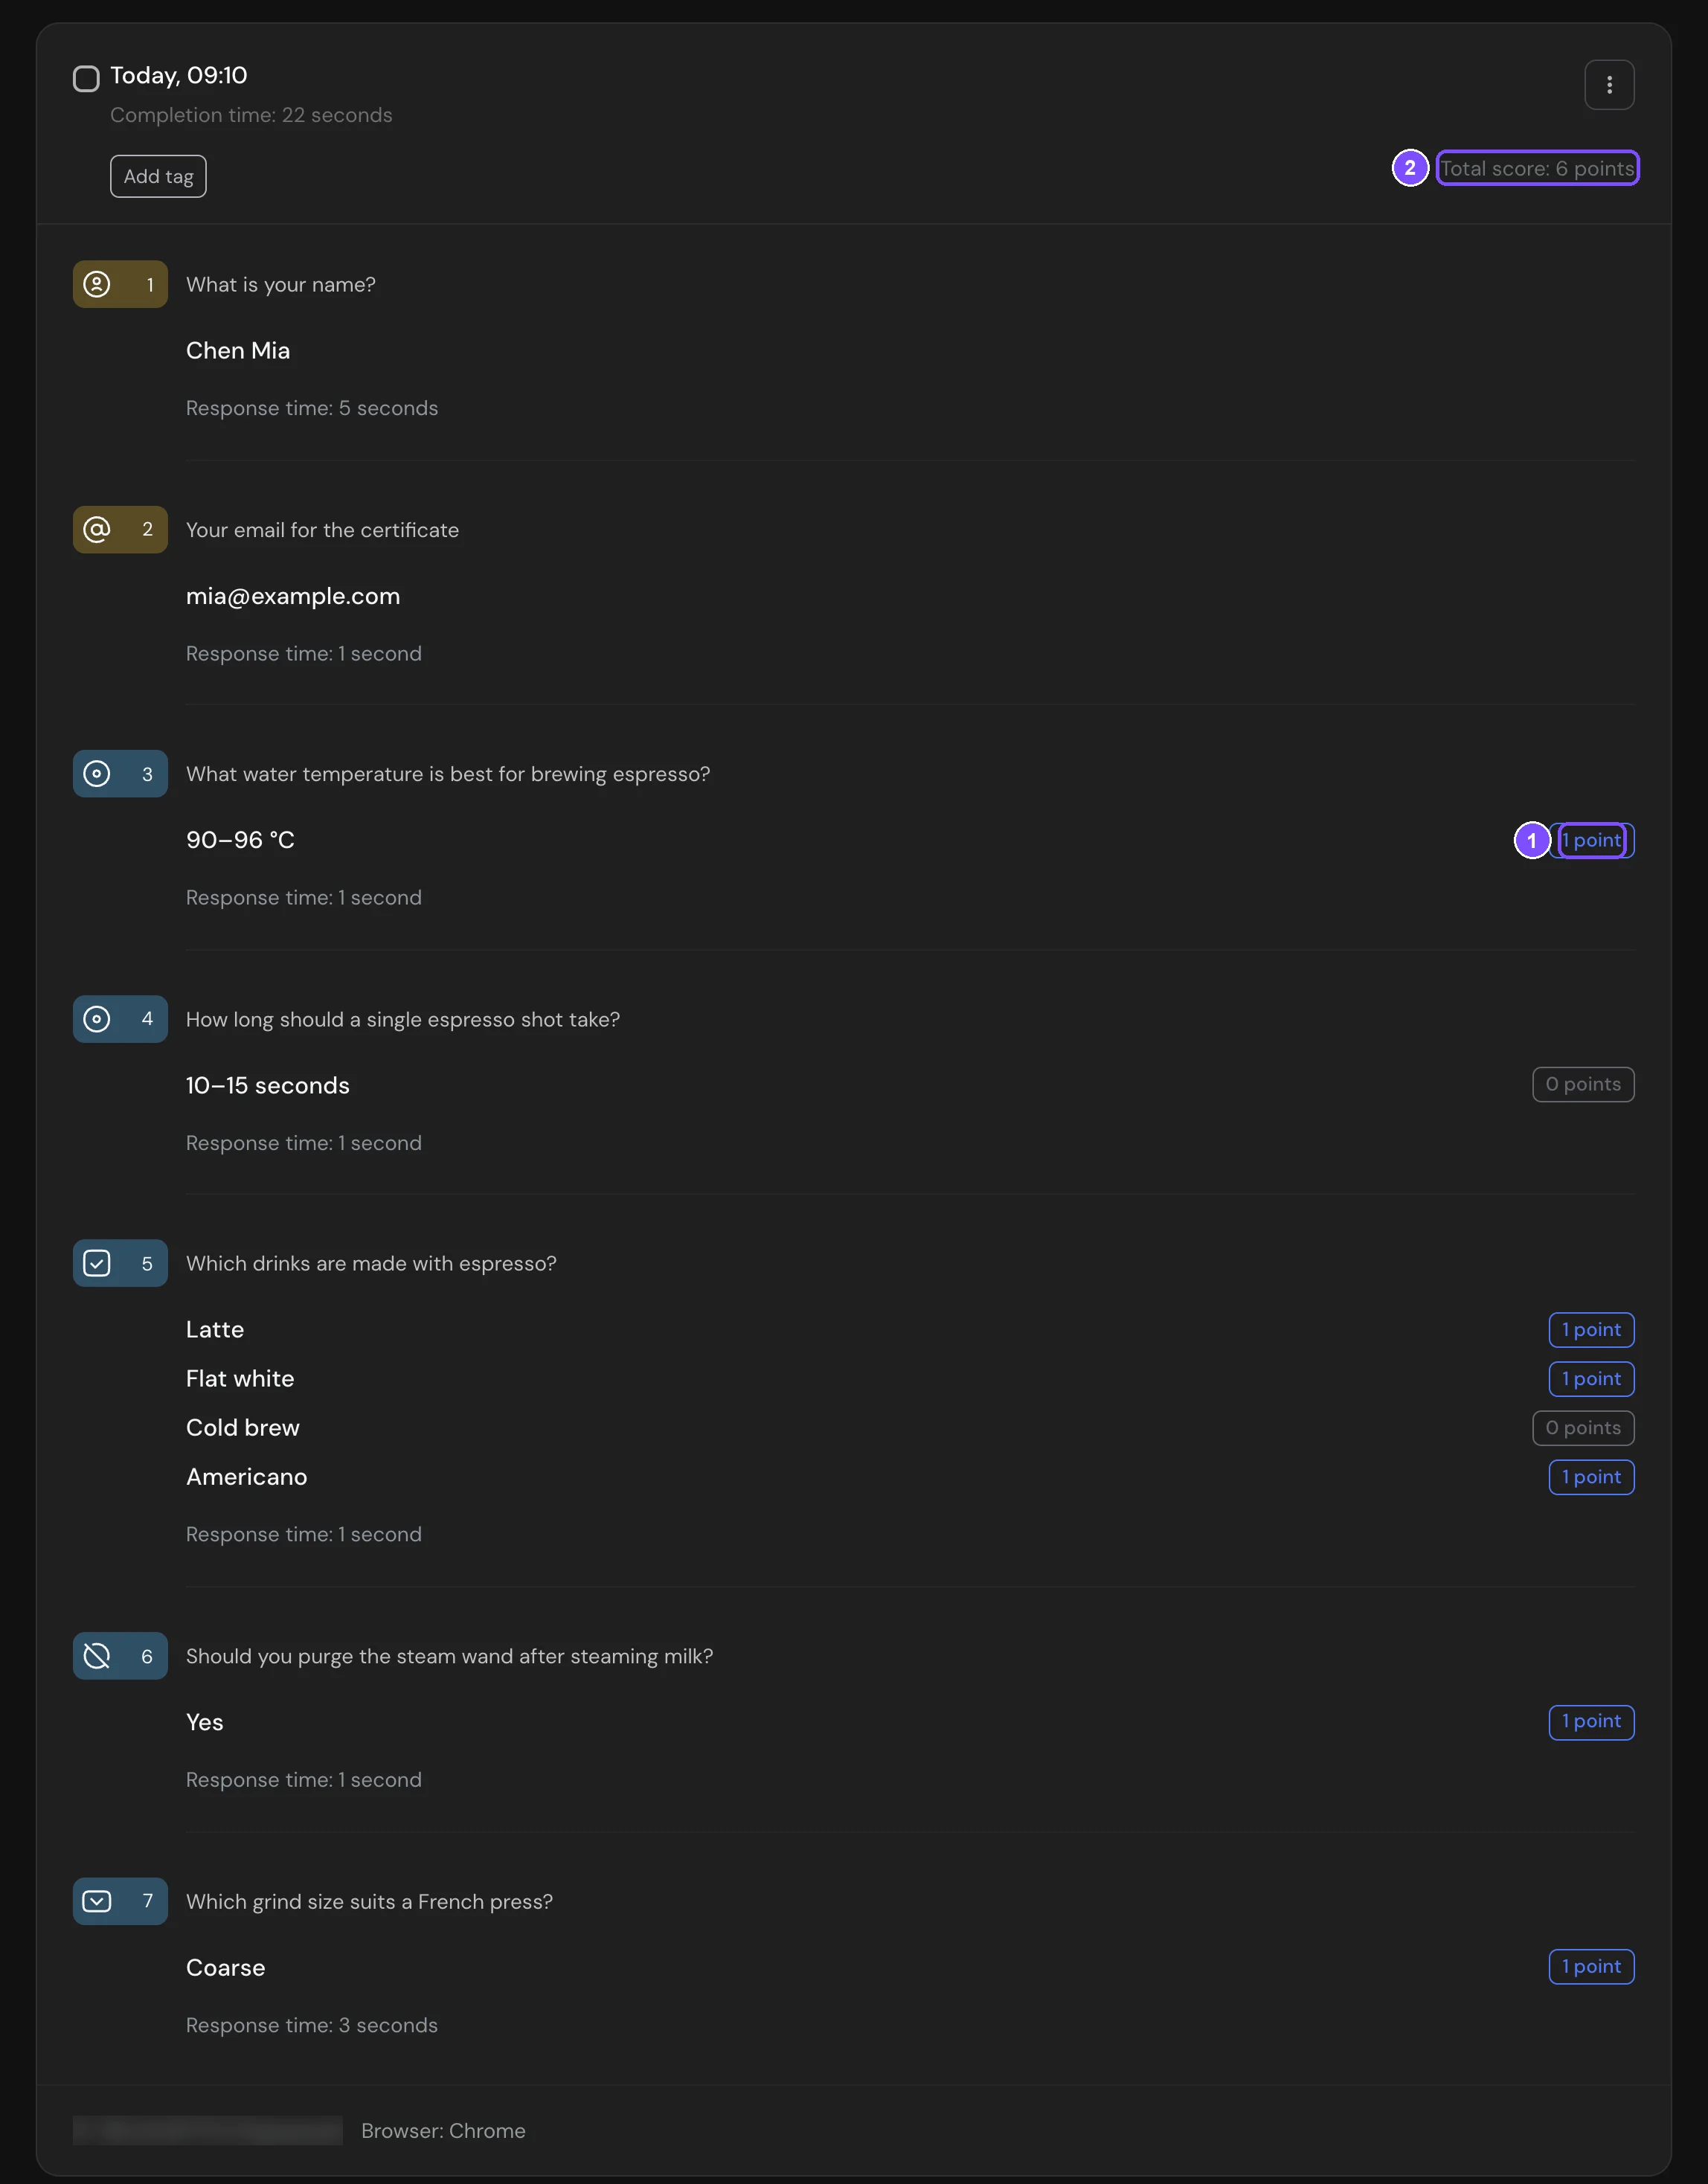
Results → Reports shows how many respondents chose each option, so you can find the hardest question. See Viewing and Downloading Survey Responses and Viewing the Survey Report.
What's next
- Email each respondent their score with the Number of points variable: Email Notifications.
- Close the quiz on a set date or after a number of responses: Response Limit and Survey Deadline.
- Turn the quiz into a personality test with categories: Scores, Correct Answers and Personality Tests.