


Online Booking
Updated
On this page
The Booking question lets respondents choose a free time from your schedule right in the survey: a consultation, a service appointment, an interview or a seat at a webinar. Schedules and all bookings are managed in the Online booking section.
Paid feature. Available on the Basic plan and higher. Compare plans
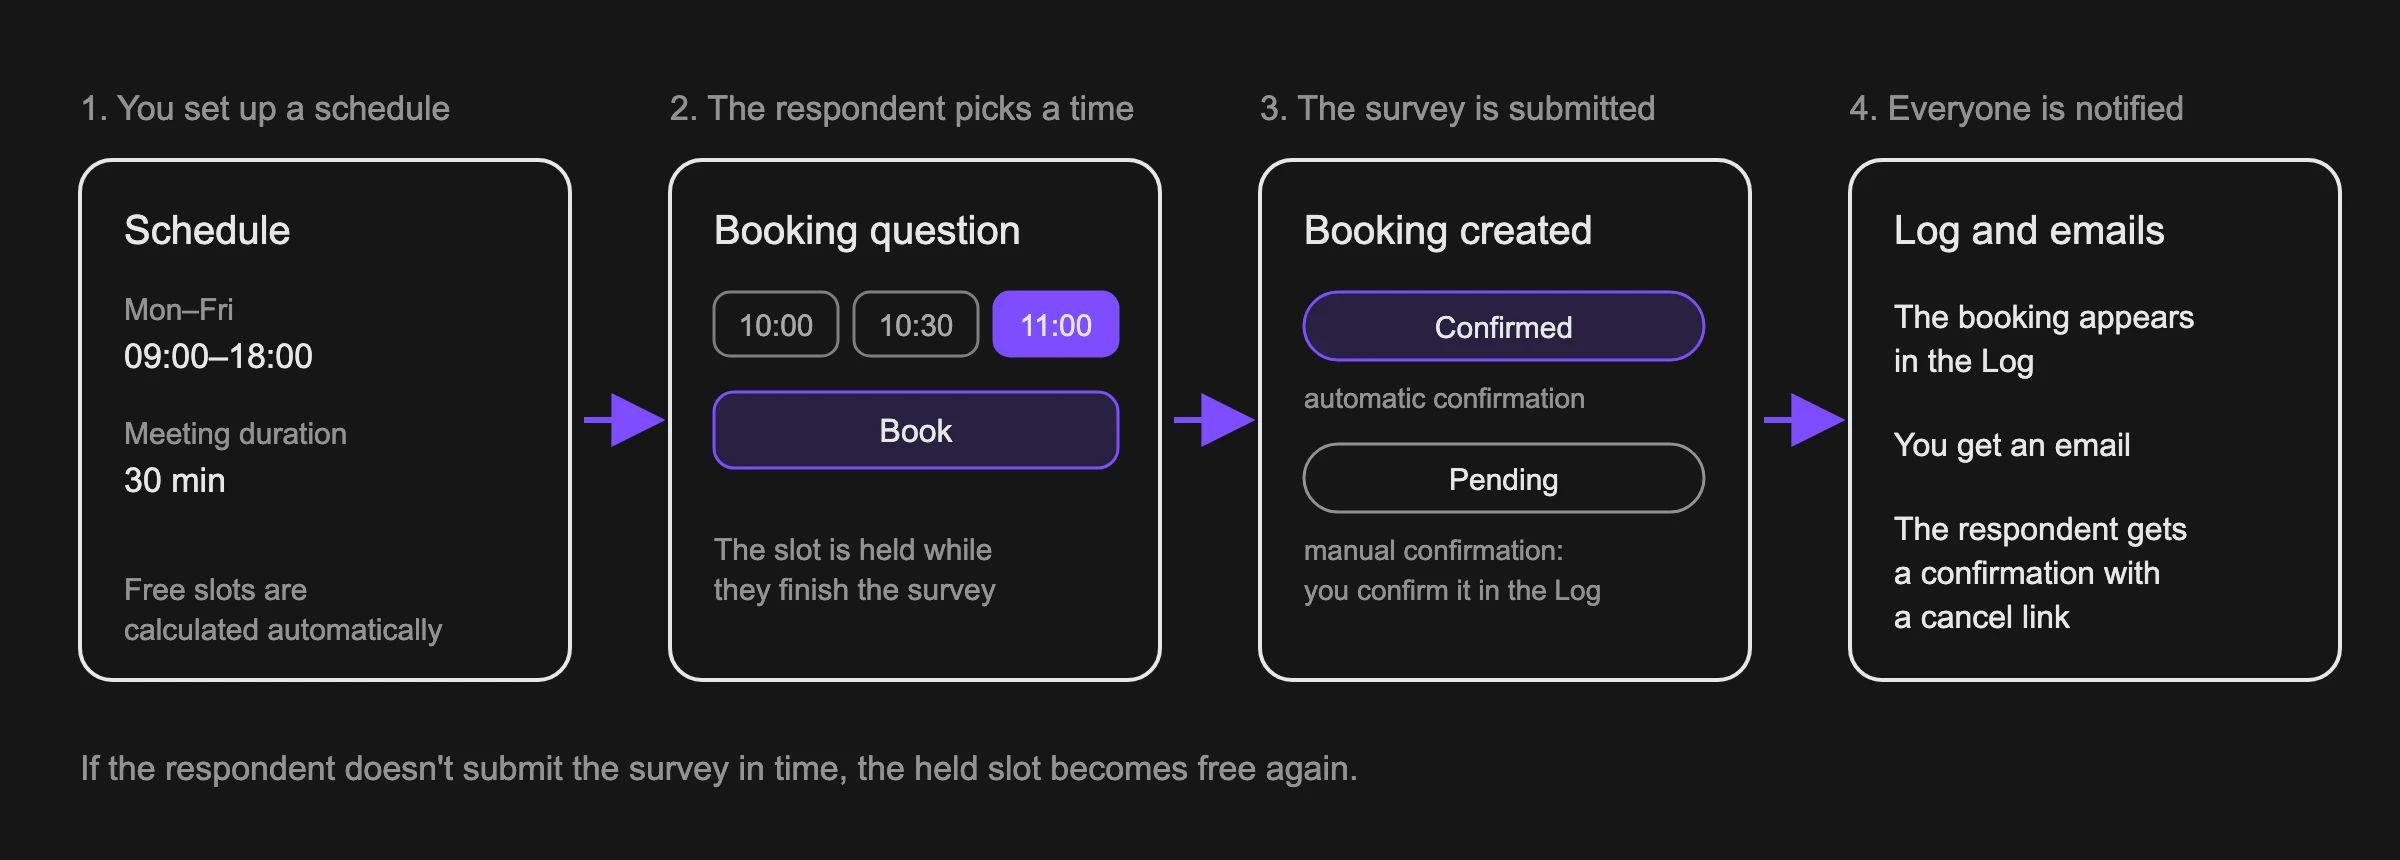
A schedule belongs to your workspace, not to one survey. One schedule can serve several surveys, and the Log shows bookings from all of them.
Adding a Booking question
- In Builder, click + and choose Booking in the Contact details group.
- Click the gear icon (Settings) on the question panel.
- In Schedule, choose a schedule (1). To make a new one, click Create schedule at the bottom of the list, and its settings page opens. The new schedule isn't linked to the question automatically: after you set it up, go back to the survey and choose it in Schedule.
- Check where the respondent's contacts come from (2): Respondent name, Phone and Email. SurveyNinja picks the first Full name, Phone Number and Email questions of the survey. Choose another question or Don't pass.
- Choose what the respondent sees (3): Show time zone, Show meeting duration and Show meeting location. The location switch works only if the schedule has a meeting location. At the moment the published survey doesn't show the location even with this switch on: respondents see it in the confirmation email.
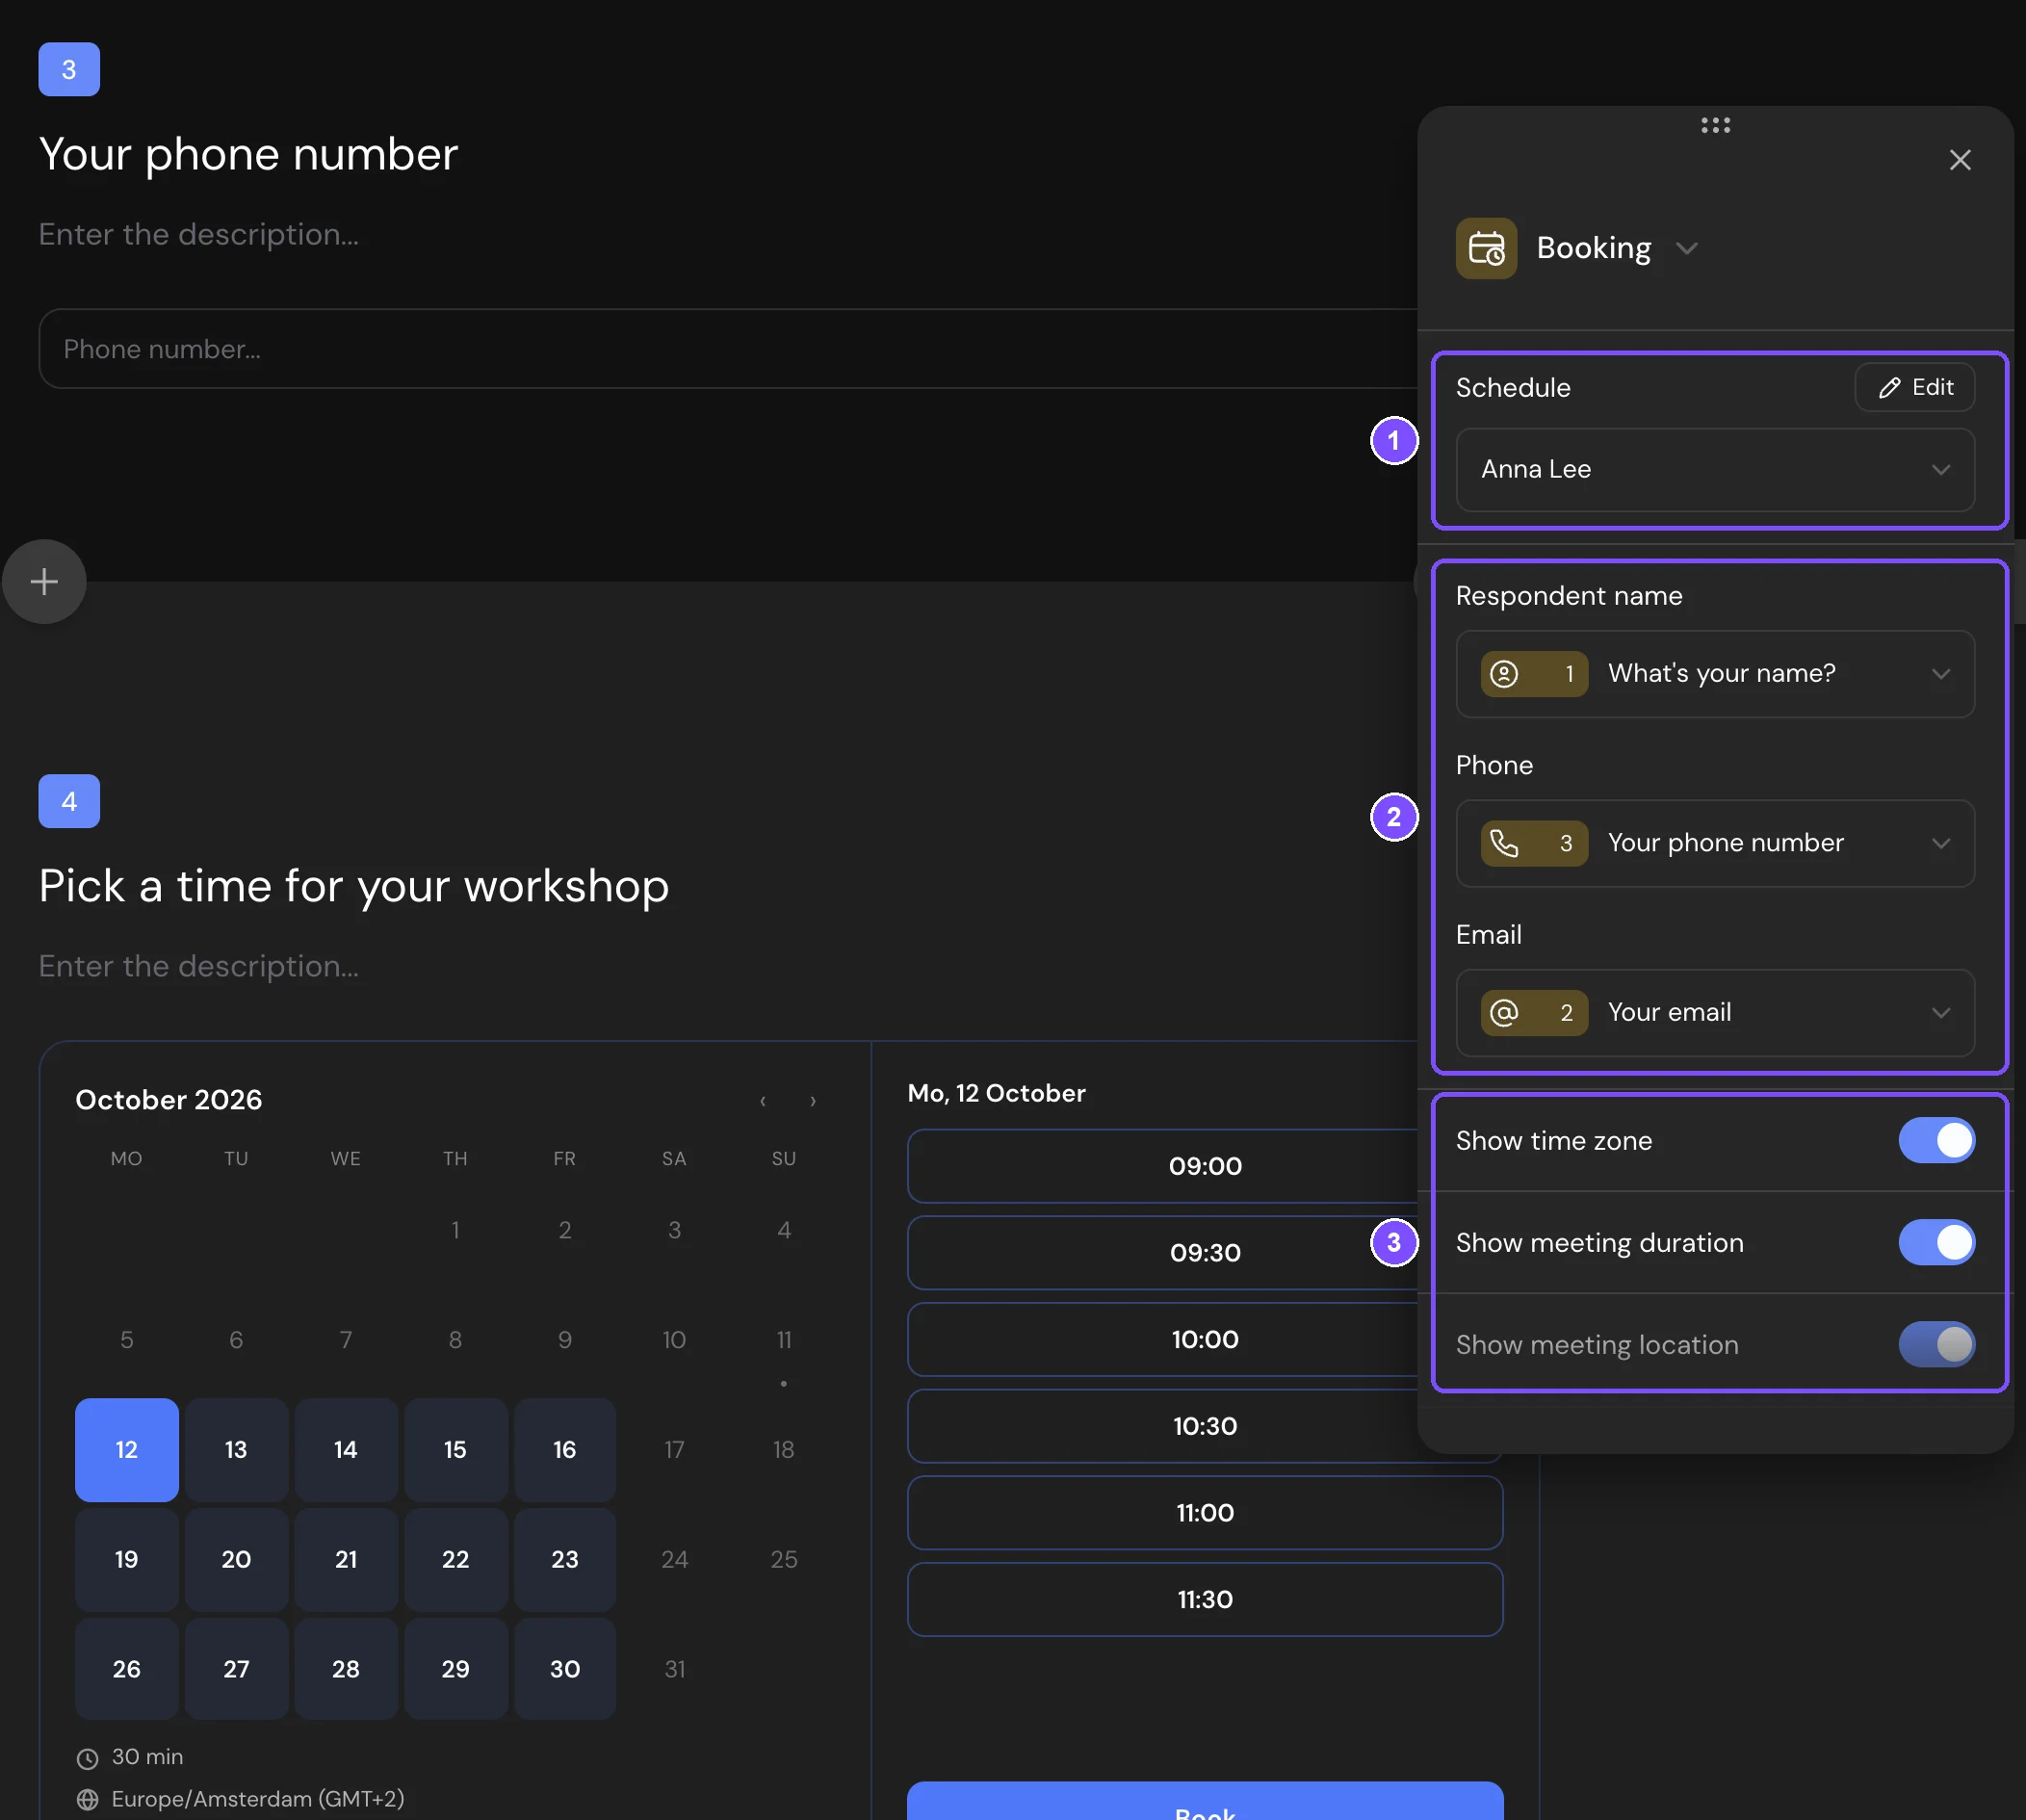
The contact questions can be anywhere in the survey, before or after the Booking question: the booking is created when the respondent submits the whole survey. Without an Email question, the respondent doesn't get booking emails.
Opening the Online booking section
- In the Booking question settings, click Edit next to Schedule.
- On the Settings tab of a survey with a Booking question, find the Online booking block and click Open.
The section has two pages in the left panel: Log with all bookings and Schedules with the list of schedules.
Note. Team members need the Viewing reports permission in their role to open the section. To change schedules and bookings, they also need Editing settings. See Team Members and Roles.
Creating a schedule
- On the Schedules page, click Create schedule.
- In the New schedule window, enter the Name, for example "Smith · cardiologist". Fill in Specialization or department later on the settings page: the value entered in this window isn't saved.
- Choose the Schedule type:
– Recurring schedule: weekly working hours, and slots are calculated automatically. For appointments, consultations and services.
– Individual slots: specific dates and times with a number of seats. For seminars, webinars and interviews. - Click Create schedule. The schedule settings page opens.
- Set up the schedule as described below and click Save.
General
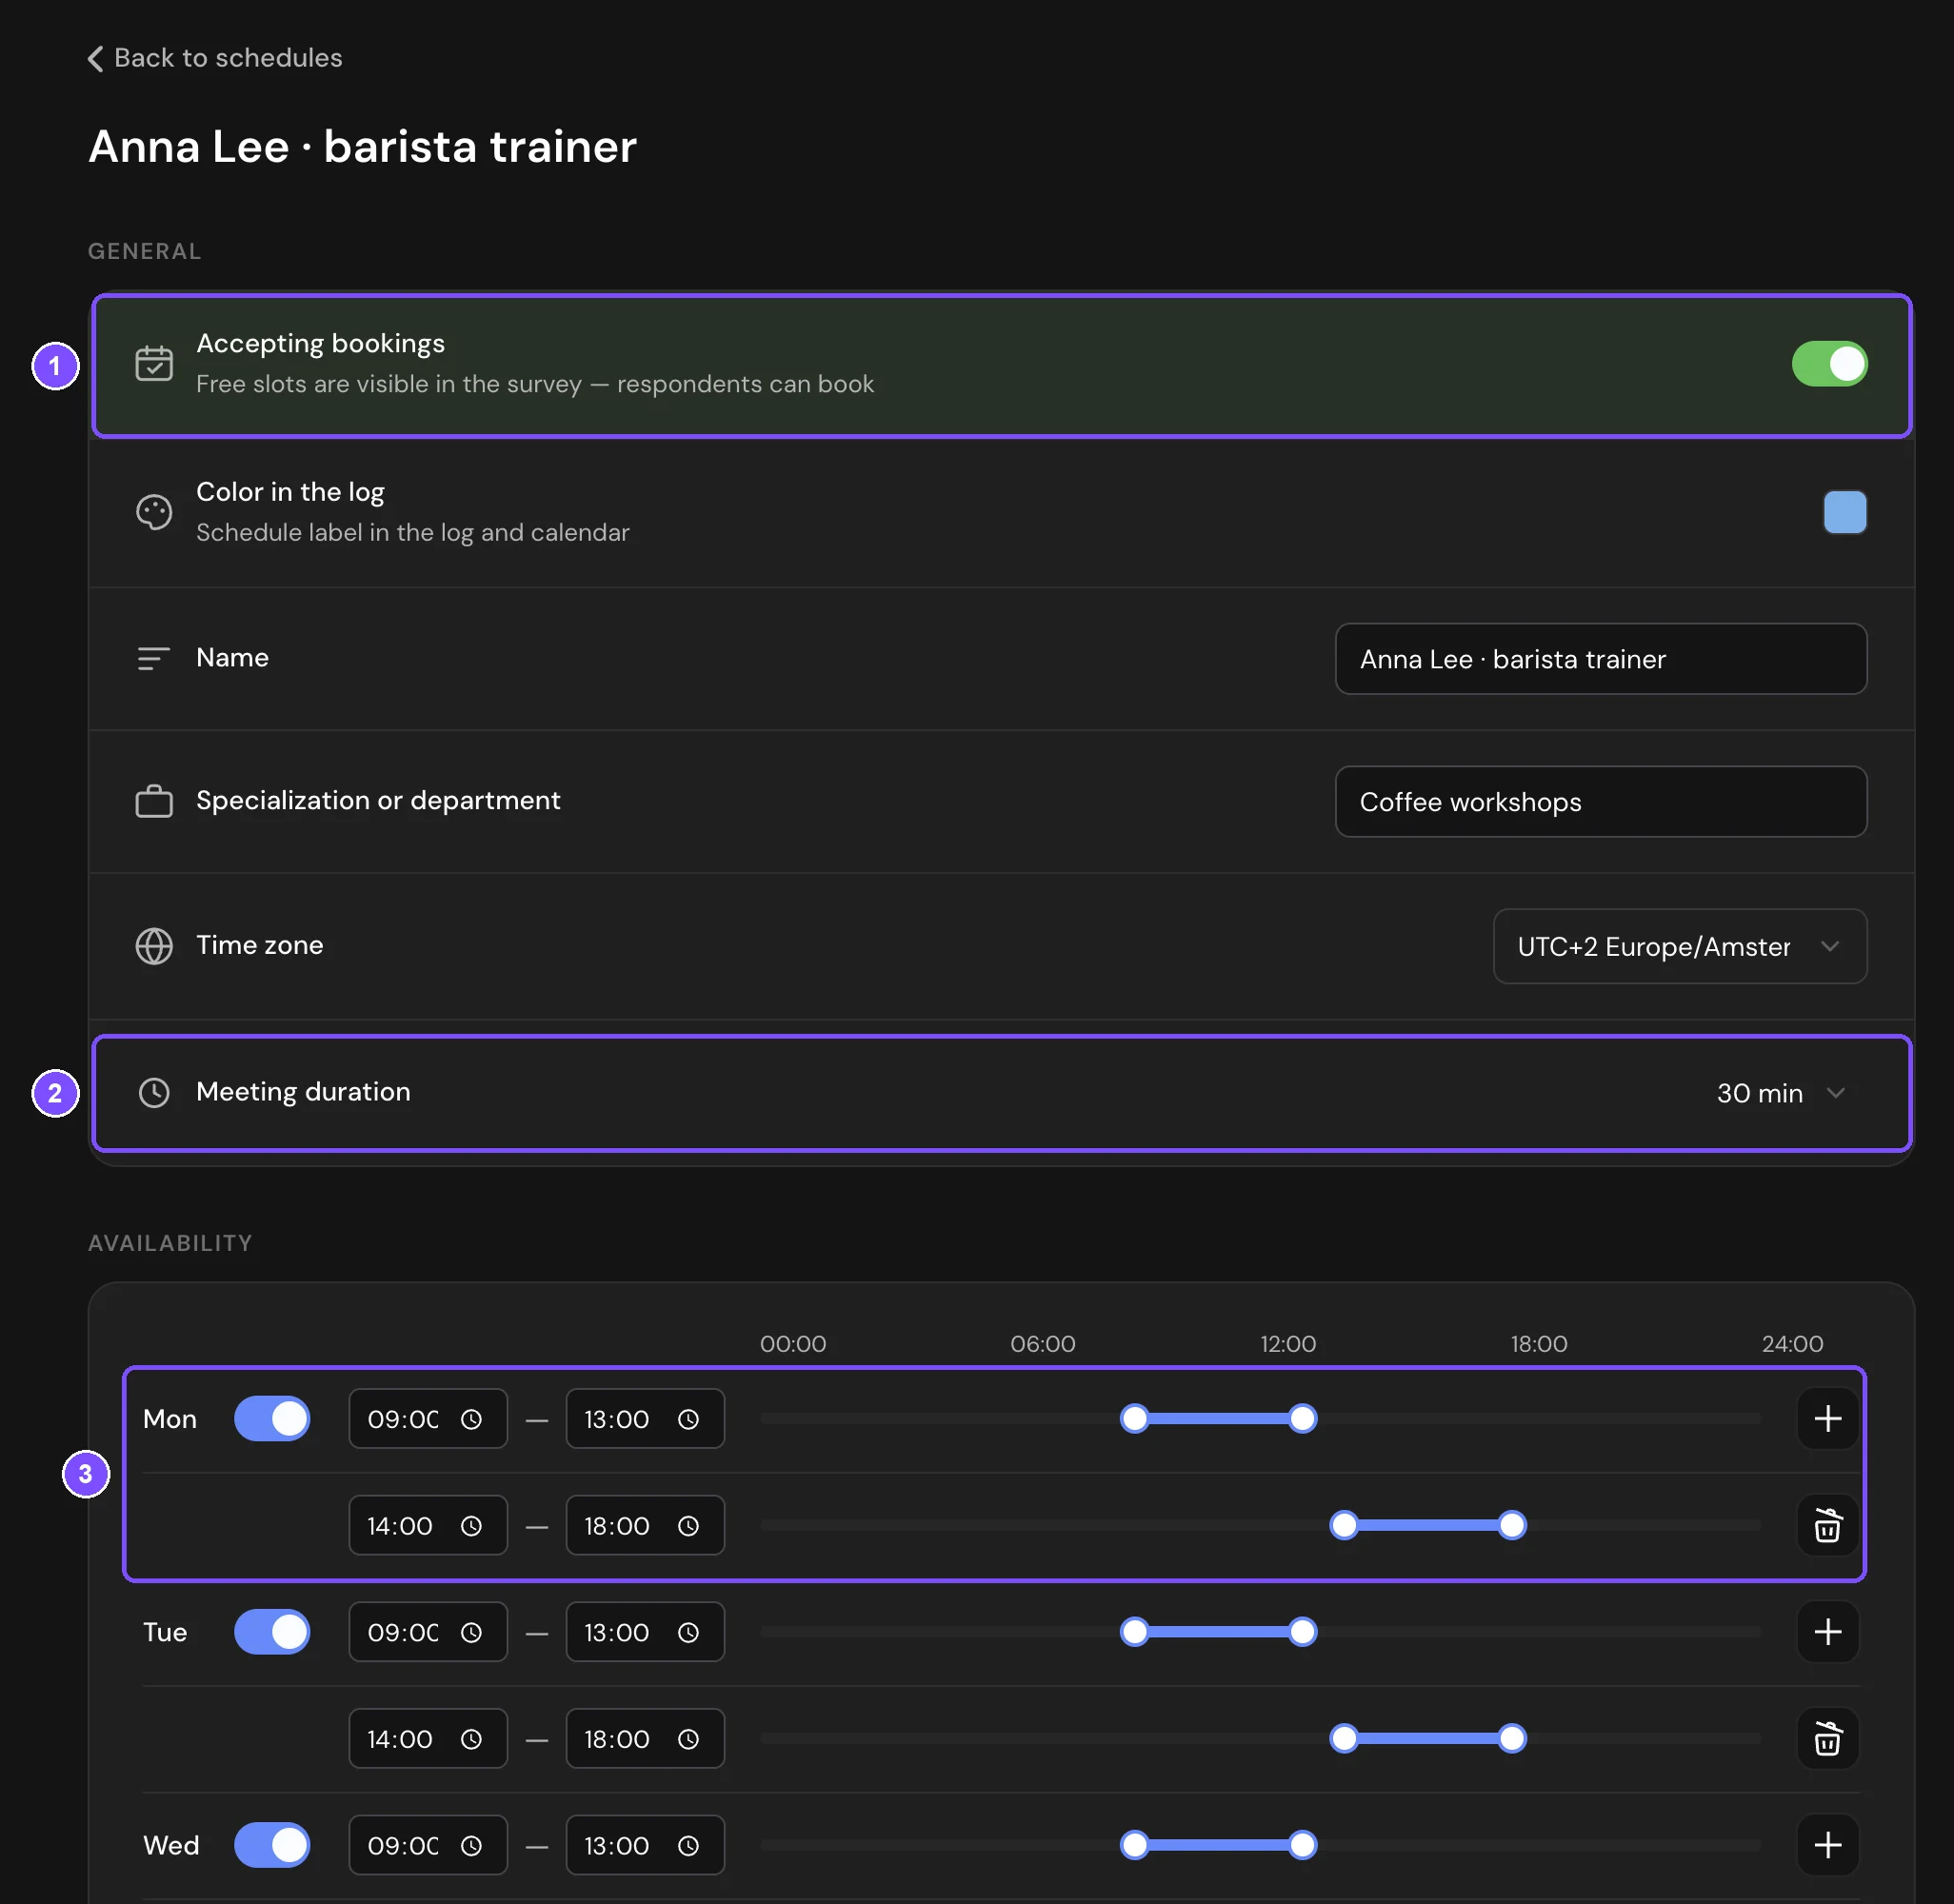
- Accepting bookings (1): when it's off, the slots are hidden and new bookings are unavailable. Existing bookings are kept. This switch is saved right away.
- Color in the log: the label color of the schedule in the Log.
- Name, Specialization or department and Time zone of the schedule.
- Meeting duration (2), for recurring schedules: 15, 20, 30, 45, 60 or 90 minutes. The default is 30 minutes.
Working hours
For a recurring schedule, set the hours in Availability. A new schedule works Monday to Friday, 9:00–18:00.
- Turn a day on or off with the switch. A day without hours shows Day off.
- Click + (Add interval) at the end of the day row to add one more interval, then set the hours of both, for example 9:00–13:00 and 14:00–18:00 with a lunch break (3). The trash icon removes an extra interval.
Under Exceptions, add vacations, holidays or short days. Click Add, choose the Start date and End date, and in What happens on these dates choose Closed all day or Different hours. Exceptions override the weekly hours.
For a schedule with individual slots, add slots under Event slots: click Add slot and set the date, time and Number of seats.
Booking rules
| Setting | What it does |
|---|---|
| Booking confirmation | Automatically: the booking is confirmed at once. Manually: the booking comes in as Pending, and you confirm it in the Log |
| Slot grid step | How often slots start. By default, it's the same as the meeting duration. Recurring schedules only |
| Slot capacity | How many people can book one slot. Recurring schedules only. For individual slots, set the seats in each slot |
| Buffer before the meeting, Buffer after the meeting | Free time around each meeting, up to 30 minutes. Recurring schedules only |
| Minimum notice before booking | How long before the start booking closes: from 1 hour to 2 days, or No limit |
| Booking horizon | How far ahead respondents can book: 7 to 90 days ahead, or No limit |
| Daily booking limit | The largest number of bookings per day. Recurring schedules only |
| Meeting location | Online (link), Phone call, At an address or Other. Enter the link, phone or address in Address / link / phone. The respondent sees it in the confirmation |
Closing a slot
The Slots section shows the calendar of the schedule. Click a free slot, enter the reason, for example "personal meeting", and click Close slot. Nobody can book it until you open it again. Click a closed slot to open it. Click a booked slot to see the booking.
At the bottom of the page, Linked surveys lists the surveys that use this schedule. To delete the schedule, click Delete schedule: all its bookings and blocks are deleted, and this can't be undone.
What the respondent sees
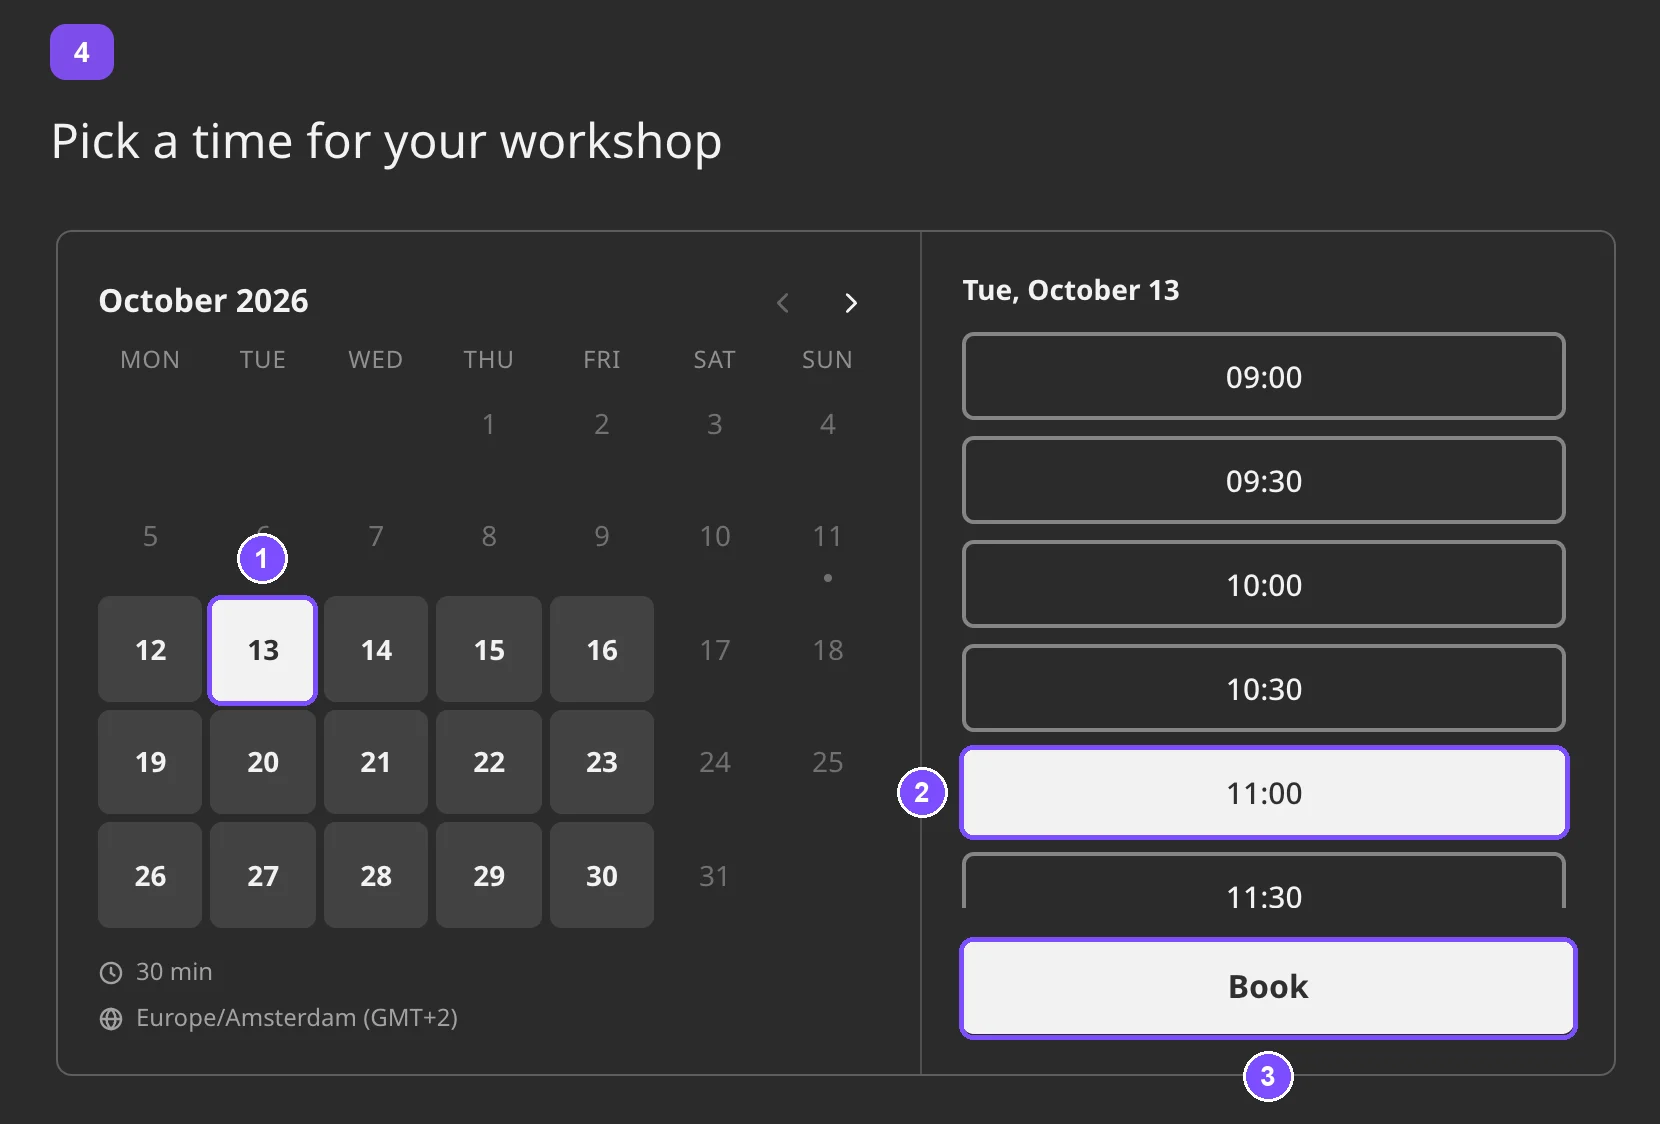
- The respondent picks a date (1) and a time (2) in the Booking question and clicks Book (3).
- SurveyNinja checks that the time is still free and holds it: "Time slot reserved. The slot is held for you — finish the survey to confirm the booking." To pick another time, the respondent clicks Change.
- When the respondent submits the survey, the booking is created.
If someone booked the same time a moment earlier, the respondent sees "This time is already taken" and picks another time. If the schedule has no free time, the question shows "No available time slots", and the respondent can continue the survey.
With Booking cancellation button on, the confirmation email has a cancel link. It opens a page where the respondent clicks Cancel booking. The slot becomes free, and you get an email.
Managing bookings in the Log
The Log shows bookings from all schedules.
- Switch the view: Day, Week or List (1). Use Today and the arrows to move between dates. The Week view doesn't show cancelled bookings. Find them in List.
- Filter by All schedules and All statuses, or search by name or email.
- In the List view, click Export CSV to download the bookings.
Bookings have four statuses: Pending, Confirmed, Cancelled and No-show. Click a booking to open its details: contacts, date and time, the respondent's other answers and Open the respondent's response. The actions are at the top of the panel (2). Add a Comment that only you and your team see (3).
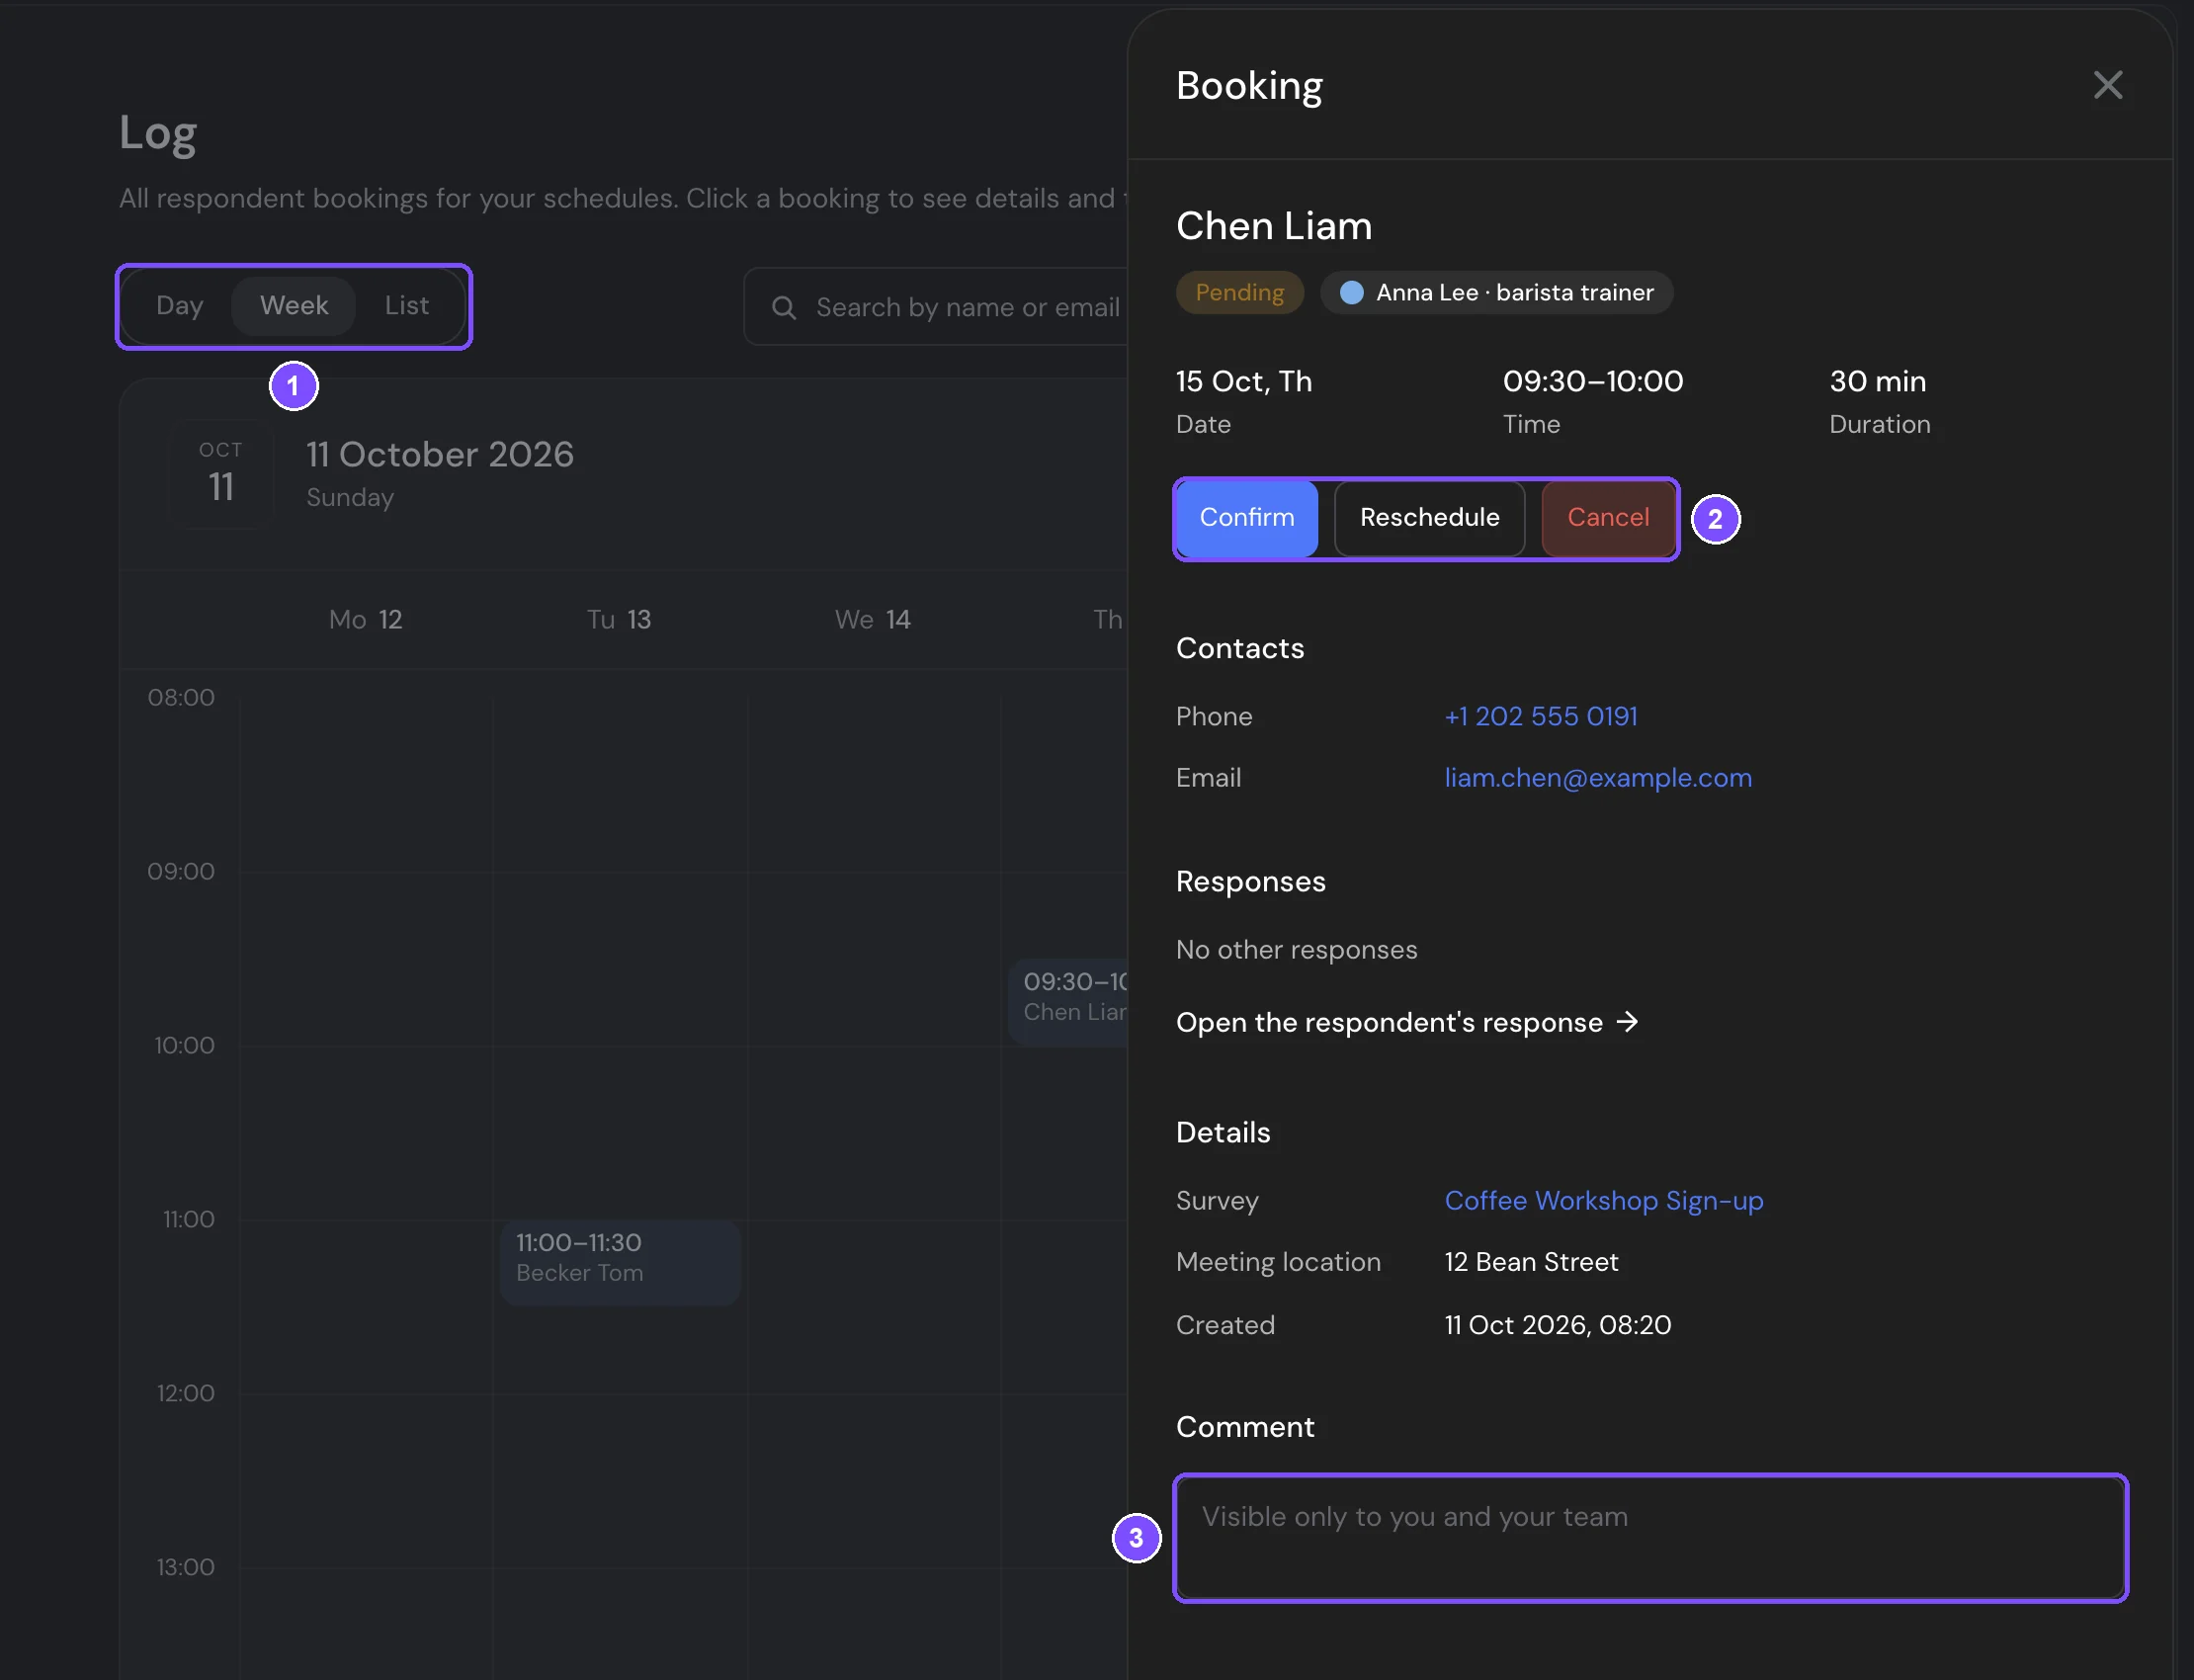
What you can do with a booking:
| Status | Actions |
|---|---|
| Pending | Confirm, Reschedule, Cancel |
| Confirmed | Reschedule, Cancel, and No-show after the meeting starts |
| Cancelled, No-show | Restore to confirmed |
Actions apply right away, without a confirmation window. When you confirm, reschedule or cancel a booking, the respondent gets an email about it.
To block time without a booking, for example for a stand-up meeting, open the Week or Day view and click an empty spot. In Block time, choose the schedule, date and time, add a comment and click Block. To remove the block, click it and click Unblock.
Booking emails
Booking emails are set up on the Notifications tab of the survey, not in the schedule. All three are on by default:
- Notify about new bookings: an email to you about each new booking and each cancellation by a respondent. If you haven't selected any address, it goes to the email of the account owner.
- Booking confirmation to the respondent: sent to the address from the Email field of the Booking question. With manual confirmation, the respondent first gets an email that the booking is waiting for confirmation, then another one when you confirm it.
- Booking cancellation button: adds the cancel link to the respondent's email. The switch is shown only while Booking confirmation to the respondent is on.
See Email Notifications.
Limits
- A slot is held for 15 minutes while the respondent finishes the survey. If the survey isn't submitted in time, the slot becomes free again.
- Respondents can book up to 90 days ahead, even when Booking horizon is set to No limit.
- Once the meeting has started, the respondent can't cancel the booking by the link from the email.
- The Booking question has no question timer.